Sunday, September 22, 2013

Kreem 'd and Cool 'd

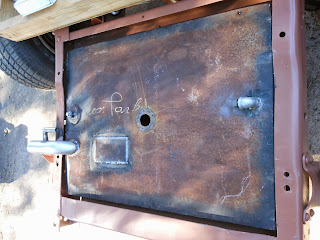
Sunday was spent trying to get the gas tank back together in one piece again and get the inside coated to prevent rust and scale.  It's been months since I worked on it so you can read all about it here: Gas Tank.  The coating method was a product called Kreem and it is designed for this purpose.  The famous  mechanic in Fort Stockton, Joe Henderson, has used this product with great success and has tanks that are over 8 years old with this coating.  

The process is a PITA and working a big heavy tank isn't fun.  I am not sure that I did the best job of coating it, but it is done and if this becomes a future problem, it will be scrapped and stainless will enter the equation.  I was going to change up the brackets that I made for it 25 years ago, but then I saw all the extra work involved and realized I would be doing a lot for little gain.

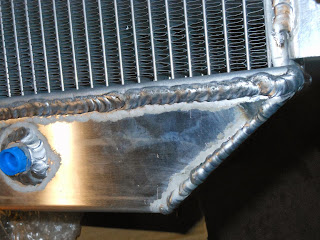
The Champion Radiator came in and looked to be in good order except for one area that had some damage from the factory.  It's not bad and the tubes look a little damaged but ok.  This is a 3 row because they were out of 2 rows.


Sunday, September 15, 2013

Welding Confidence Has Returned

Got a little done today.  Headers are installed and the Sanderson's went in pretty smooth by following their instructions and using the Ultra Black Silicone of the gasket material.  Not a fan of silicone as a gasket material but things change after 20 years.  One bolt on each side was so close all I could get was an open end wrench on it.  Getting leverage to attempt the 20lbs of torque was impossible.

I checked out the radiator that came with the donor truck and it appears that I will probably be looking for another option.  Reason #1, it doesn't fit and #2 the trans cooler connections look awful small.

For some reason, I have had some kind of mental shut down about the gas tank and getting it done.  Sometimes it pays off just to pick up the torch and burn some steel.  Don't know why I was reluctant, but after I got started, the creativity started up again and before I knew it a lot of my unknowns were solved, including how to put a vent tube into the filler neck. 

Straightening out the front tires worked out great for moving the truck in and out of the garage.  It rolls so easy now that I almost rolled the truck through the back wall putting it up. 


The gas tank I made 25 years ago had some issue that I recall and one of them was venting when the truck wasn't level.  The filler neck need to be moved and the far side of the tank needed to be vented back to the fill neck to vent air.  Took me a while to figure this out but I manage to make a fill neck fitting out of some stainless tube I had laying around.


Homemade vent tube

Saturday, September 14, 2013

And the Winner is: Sanderson!

Four trips this morning to O'Reilly's wasn't on my agenda.   So after finally getting the right serpentine belt and the power steering pulley installed, the new belt system is complete.  84" is the correct length and it ain't exactly a one man show to get it on there.  

Due to the 440 engine I had in the truck, the drag link needed to be adjusted with a heat wrench to make it work.  Now that the Chrysler power plant is gone, it was necessary to get a new drag link and straighten up those duck toed front tires.  With Doug's help we got that done and just as we were finishing up the new Sanderson headers arrived. 

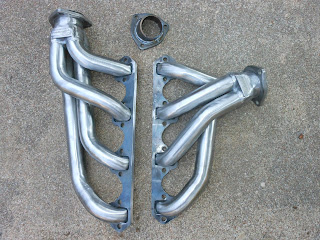
These are the FF6-P and fit great!  Plus they came with an angled flange that will allow for all kinds of adjustment.  They look like professional hand made one off's and are heavy material.  They also have good installation instructions and come with header bolts. 

These are unpainted and Sanderson recommends VHT paint.  They are currently baking in my oven and stinking up the house.


Thursday, September 12, 2013

A Little Form

I have always been a "Function before Form" type person and on this project EVERYTHING is function.  Even the pretty seat.  All the work that has been going into the engine has been to get it moving down the road, until now.  Bling is now installed, old school bling, and me likey...

Before
After


Early this morning, after our 4:45 am run, Doug and I piddled a little bit and installed the dip stick.  It was a little tricky and required the use of a tubing bender.


Here you can see where the dip stick mounted and the washer behind the bracket to keep it level.

Wednesday, September 11, 2013

351 Windsor Headers for Bump Side F100

It's late, I am beat, but I wanted to get this out there and let you see how close I got to success on put 351w headers in a bump.  The Hedman 88650 was close, DAMN close to being the ones to use.  The side clearance was incredible but they hit the cab in the back.  I couldn't get the driver side on completely and the passenger fit but only has .125" between the cab and the tube.  I will give  a more complete description soon,


Update:  Sanderson FF6-P fit great!  Plus they came with an angled flange that will allow for all kinds of adjustment.  They look like professional hand made one off's and are heavy material.  They also have good installation instructions and come with header bolts. 

Passenger Side

Old Header


Headman 88650


It clears everything but the cab!

Driver Side

Old Header


Headman 88650


Top Left: headers from the Donor Truck
Top Right: Sanderson
Bottom Middle: Hedman

Sanderson work and get you plenty of room to install your exhaust system.