Sunday, January 26, 2014

Lots Done


Below is my to do list to get things rolling down the road.  I intended to post this list last week, but do to a file conversion issue I didn't.  It's nice to have list on this type of project.   The side tracking that happens when you are working on something is overwhelming at times.  It eliminates the head scratching and keeps you moving forward.  


Lots of little things were done today that weren't worthy of photography.  So we got out of the habit of shooting pictures and didn't get a before picture of the seat belts.  They were so nasty that wifey said to trash them.  But with some simple water and a brush, they almost look new.


The Anes horn that my father in-law bought at an estate sale found its home.  Its goofy looking, and sounds ridiculous, so its a perfect match for the truck.


I got the sand blaster after the steering wheel and it worked well.  some of the original paint wouldn't come off but it will cover well with black paint.  I filled the cracks with JB Weld.  It will need a little more before paint


Saturday, January 25, 2014

Leave it to the Cable Company

My goal for the day was to get the transmission linkage and the TV cable of the AOD set up.  But when it came time to cut the $150 cable, I just couldn't bring myself to pay that kind of stupid tax.  I haven't ever set one up an I have too much invested to get over confidant.  Let Phoenix set it up an lets make sure it is right.

I used the Lokar shift linkage and it is extremely adjustable and well made.  After struggling with fine tuning the linkage, I thought Phoenix could tweak that as well.

So back to fabrication!  Problem - Speedometer cable was laying on the exhaust.  Solution - a stainless steel (because I had a piece of scrap) bracket held on to the exhaust with a hose clamp.  Lay the cable on the tab and put a hose clamp around that.  Ta da!  No melting speedo cable.


Friday, January 24, 2014

F600 Mechanical Tachometer Replacement

I thought I would single out this topic for the pure joy of finding a tachometer that actually fits the F600 mechanical tachometer hole size.  Any of you how have tried to accomplish this knows that most tachs are 3 3/8" diameter and that doesn't fill the almost 4" hole the old tach left behind.  Then there is trying to finding something that looks close to original is almost impossible.


I pursued all angles:

1.  Rebuild the original.  I found two companies that would put new guts and a new face to match the original, but both were over $400.  I don't mind putting money into something but there is that part of me that considers the amount of return 400 plus dollars would give back and I wasn't seeing it.

2.   Try a smaller size diameter and spend less money.  I then went  to another option and used a $100 tach that was 3 3/4" and had a friend of mine laser cut some rings to fill the gap and it looked pretty good.  The problem was that the tach didn't like good ol' ford genuine parts and wouldn't work.

3.  Spend a little more money for the right size.  I started researching again and on my first search found the tach that would fit.  I don't recall finding this the first time I sought out a tach but maybe I did and just didn't like the $169 price tag.  That price seems insignificant now that I spent a total of 2 working days trying to get the $100 tach to work.

The Auto Meter Cobra Tach Is a 4" diameter and has a bezel that matches the rest of the gauges and takes 10 minutes to install


I didn't realize how grubby my panel was until I saw this pic.

Monday, January 20, 2014

Squeak, squeak, squeak'um

Today I continued on the list.  Most of it really wasn't picture worthy except my resolve for getting the emergency break cables off of the leaf springs.  This is a technique that I developed in college for connecting braided cable with out bolts.  First make a tight wrap with bailing wire, then carefully braze it flowing the brass throughout wire into the cable.  The nut acted as a stop in the existing frame bolt hole.  The cable provided a flexible/adjustable hanger for the emergency cables.


I tightened up the motor mount bolts, put in the front light lens's, tied up the wires and break lines under the cab and bed.  The idler pulley has been squeaking like crazy so I dismantled it and discovered it was a sealed bearing, so I greased what i thought might be squeaking and put it back together again.  Damn the luck.  It still squeaks.

Something has been causing the motor not to crank over after it has been running for a while.  The starter wire at the solenoid starts to smoke and it just wouldn't go.  Upon inspecting the starter wire, the ends had been drilled out reducing the contact and that doesn't work well for amperage.  So I replaced the wire and the solenoid and so far it seems to be working well.

The emergency break adjustment was a whipping.  Nothing hard but some times what is suppose to be easy isn't.  I dismantled the lever mechanism under the truck and chased the threads with a die and presto!  It works now.

Tightened up the motor mount bolts (the big ones on the rubber pad) which seemed to take an eternity.  I used a grade 8 nylon locking nut.

Sunday, January 19, 2014

Self Serving Fuel

So last week I made the "list".  The list of stuff that needed to be completed to get this done.  Today I tackled the fuel tank and hooked it up to see if it would work.  The neck of the tank didn't have the best angle on it so I cut and bent it where it needed to be and fastened it down.  It actually sucked the fuel up hill with the greatest of ease and there was only 3 gallons put in the tank.  No more sticking a hose in a 2 gallon can.

With the help of Doug, the brake were bled and he installed new lug nuts all the way around.  I got the licence plate light working and brought the transmission fluid up to level.


Glow Shift Tachometer Revisited

The new filter came in for the Glow Shift Tach and now it is acting up a different way.  The RPM's appear to be reporting properly at idle and upon throttling up, jumps around a little then stops at 3,000 RPM.  The first single filter was suppose to be for distributor with points (which read 10,000 RPM at 1,500) and the second was for an HEI system. Given that this is 1969 ignition technology that Ford used for decades in almost every car they manufactured, I am disappointed that this still isn't working.  This issue is holding me up and hand it not been for the Tach, most of my interior dash would be put together by now.

Otherwise I got the following done today:

  1. fuel sending unit is hooked up 
  2. high beam switch is mounted,
  3. break light switch is installed 
  4. steering column is wired 
  5. vacuum re-routed for dash vacuum gauge
  6. speedometer cable and gear installed at the transmission
  7. checked all signal lights (all are working)
Break, turn signals, emergency flashers and running lights all work for the rear of the truck.  Not bad for sitting for 21 years.  I haven't even opened up the rear signal lights to inspect them.  So out side of the horn and brake adjustment, I am ready for an inspection sticker.

Saturday, January 11, 2014

The Nerve Center

The tangle of wire pulled out of the truck months ago looks like a yanked out nervous system of a robot.  I have been dreading this part of the project since before I started because it is the part I am most unfamiliar with.


So far my parameter dealings with it have been successful and the 
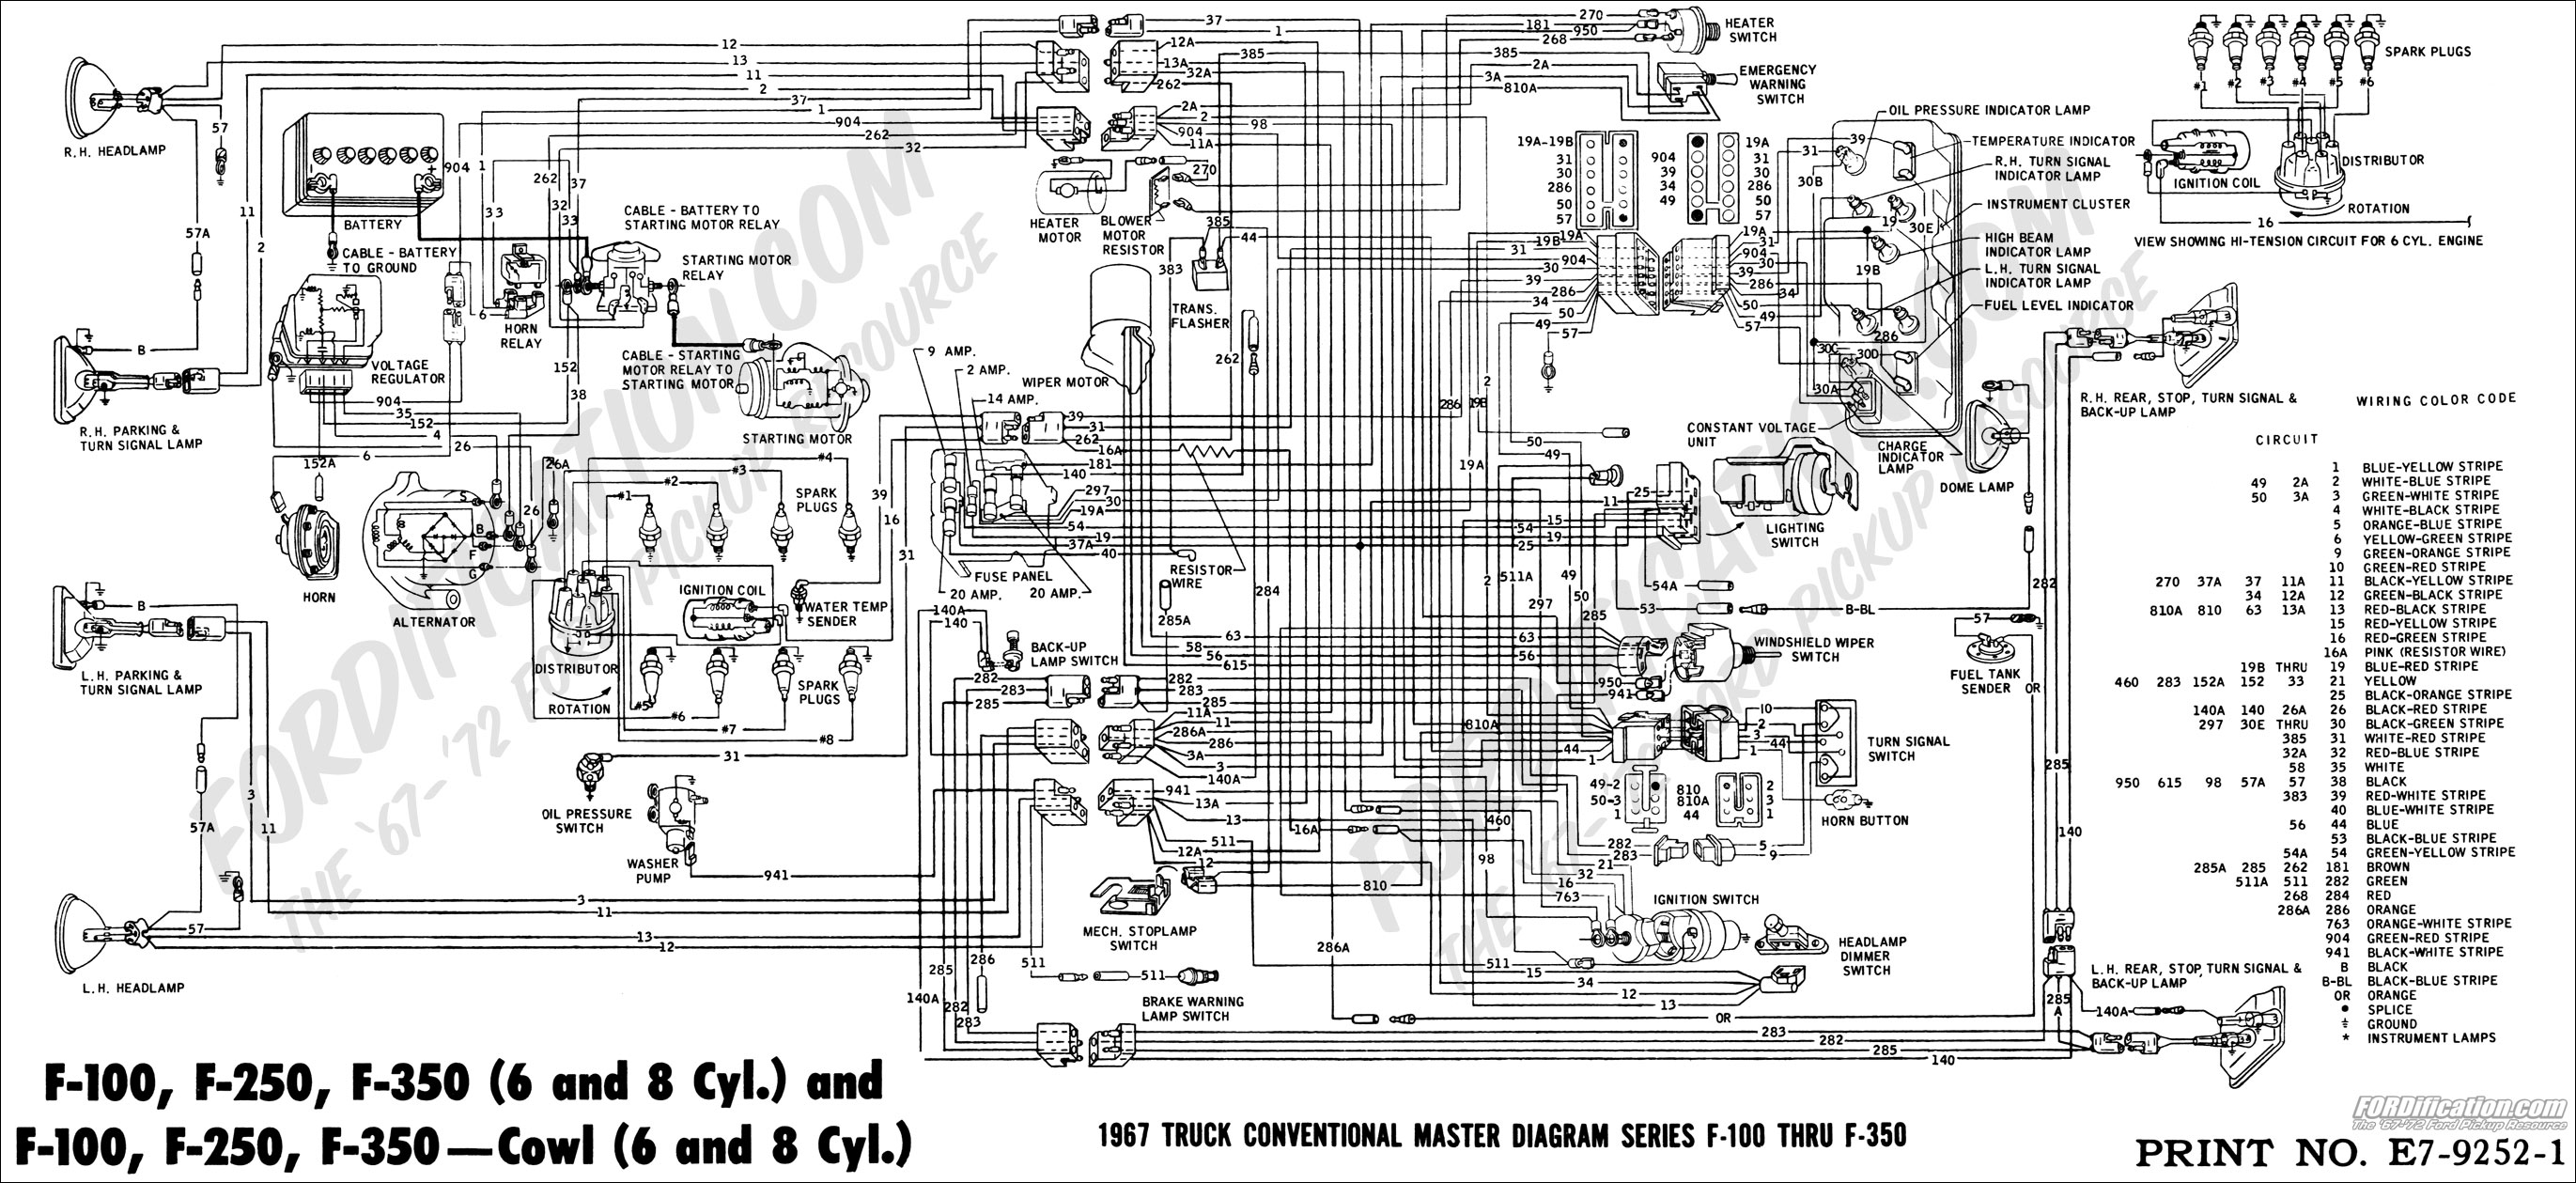
comprehensive wiring diagram is becoming a close friend.  I was able to hang it and get most of the operational switches re-installed and working this weekend:

Brake trouble light
Lights
Key
Cigarette lighter
Emergency flasher

The emergency flasher that was in the glove box (that fell apart during dismantling) was moved to a dash location with a switch that I got out of the '69.  I just had to unwrap the harness back and only cut one wire to make it longer.

The gauge panel lights were all tested and installed as well as the tachometer.  I decided to use the wiper switch that came on the F-600 gauge panel.  The result after plugging it all in was the old stuff all worked, the brand new high tech Glow Shift Tachometer did not*.  It seem to work at idle but when the motor is at about 1,500 rpm,  it says 8,000 to 10,000 and anywhere in between.  This shut down my progress by trying multiple power sources for my constant and switch power.  Nothing worked even though I used their recommend "tach filter" to keep out interference.   Just had a thought:  Shielded Wire.  *NOTE: I talked to Ross at Glow Shift and they are sending a different type of filter that he says will fix the problem.  That filter did not work either.  Read HERE for the solution.

The tach required constant power and switched (key in on position) power.  Being not sure where to source this to prevent overloading anything, I ultimately decided to run a fused power wire from the battery and run a wire from one of the 2 auxiliary connections at the fuse block.  Using 2 - 2 wire connectors that I got at O'Reily's, I was able to set up a plug in for the tach and the future radio.


I assembled an ignition wire set (the 3 wires that go from the harness to the coil and oil/temp senders) using an old plug.  A new one cost $50 and I didn't see the value in that.


My favorite father in-law bought an old Anes Horn at an estate sale (I am not allowed to call them yard sales) in better condition than the one pictured below.  It will be my new horn.


Miscellaneous Issues

The power steering pulley wasn't set far enough in so the belt was tracking off of the crankshaft pulley. I pressed flush with the shaft so that problem was resolved.

After I fixed the belt issue, now the idler pulley is squeaking.  Damn the luck.

The rear main seal started leaking pretty good.  The consensus amongst my automotive brethren is to give it a chance and that it could be from lack of use.

Don't have the brake lights working but I am guessing that after installing the steering column wiring that they will come around.


Saturday, January 4, 2014

Real Progress

Finally one day of reasonable weather and health.  The last week has been tough with respiratory illness in my head and chest.  I managed to get out of short periods of time and work while hacking my lungs up and feeling like I was 20 feet underwater.  New Years Eve I finished the fuel line from the tank to the engine bay and New Years Day I used beer to bait the neighbors over to put the bed on the truck.

Today I was feeling mucho better and got the bed lined up and bolted down, installed the bumper and tailgate, and rebuilt the rear wiring harness.  The harness was in good shape and after a quick install the rear lights are working.

A friend came over and I fired up the motor to let them experience the sound.  The mufflers under the bed make a nice rumble at idle and it sounds great.  I am ready to get this thing rolling.