Saturday, September 7, 2013

Lots of Feel Good Today

Most of you following this know what it is like to have something hanging over your head.  The thoughts, concerns, questions, and worries over something you may or may not be able to control.  It seems like every bolt in this project is that way for me.  Maybe not every bolt, but it "seems" that way.

So lots of peace of mind happened today with the help of Doug who graciously gave me his time once again.

1.  Installation of the intake manifold
2.  New thermostat and housing
3.  Bottom pulley and timing indicator installed
4.  Alternator brackets modified to fit a G3 alternator and installed
5.  All water pump bolts found / made and installed
6.  Water pump altered to fit with power steering bracket
7.  Bolts made for power steering and A/C bracket installed
8.  Fuel pump installed

The balancer is the jewel that made this work out well.  It is Summit Racings part # SUM-163289.  It is adjustable to line up the timing marks and belt tracking for the pulley.  Cool solution.


The alternator that came out of the donor truck was a G3.  Thumbs up to the previous owner on that, but it was slightly too fat to fit in the 1990 bracket that was designed for a G2.  Plus I needed a 6 groove pulley and desire to go back to the junk yard was absolutely zero.  My team over at O'Reilly's came though big time!  They don't sell them but had a few in the back and gave me one that fit perfectly.  I hit the bracket in one spot with a sanding wheel and ta-da!  Done.


Most of the concern was the fitment, bolt procurement and alinement for the brackets.  If you have worked on Fords before you know quality 7/16" bolts are not easy to find.  The best resource is Tractor Supply.  As a matter of fact you should alway make this your FIRST STOP when looking for bolts.  They sell them by the pound and make most bolt resources look like a rip off in cost and quality.


The power steering / A/C bracket had an interesting twist to the installation.  It had a hole lined up over one of the water pump bolts with a gap that wasn't large enough for a bolt head or nut.  The bracket didn't need it structurally but instead of grinding out the bracket chose to shave down the water pump by about a 1/16th of an inch for the clearance.  No decision has been made yet with what to do with the rest of the bolt.


The sun visor project is now complete and we are stunned at how well they match the headliner.  The plastic paint that I used would not harden after 5 weeks of waiting, so I over sprayed them with a clear flat Valspar paint that I used on the interior.


Tuesday, September 3, 2013

351 Windsor Intake Lesson

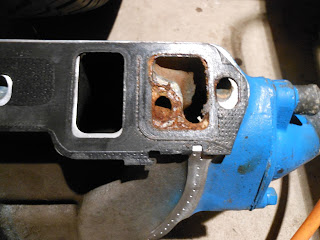
Well boys and girls, today's lesson is the proper use of a 351 intake manifold gasket.  As seen in the photo snagged from Fordification.com, the 351w had 2 different intakes.  One with 16 bolts and those after 1977 12.  In the Polaroids below, it is unwise to mix and match gaskets due to corrosion and the overwhelming possibility of turning your crank case into a delicious looking milk shake.  Note the marvelous examples of corrosion that bolts 13, 14, 15, and 16 were exposed to, and lets not forget to honor the wounded threads.

I do believe this is why there was water in the oil.  


L Shaped water port, Square shaped gasket.
Guess which intake bolt didn't have water exposure.

From Mustang Steve (good job sir!)

If you are installing early 351W heads on a 289, 302 or 5.0 engine, take note of the water port differences and gasket requirements.  You MUST use the correct 351W gaskets on the early heads or you will get four major water leaks! The early 351W intakes had 4 extra bolts that went through the 4 water jackets. You MUST use a 351W head gasket on early 351W heads that have the "L" shaped water ports
Wrong #1

Wrong #2
Correct!


Sunday, August 25, 2013

Same, But Not The Same

Motor out, motor in.  Looks the same but now there is a new overdrive transmission sitting behind the motor with many upgrades.  I have put details in the picture captions to show you all the good work.  Unfortunately, auto mechanics is like golf (which I never play), if you don't practice, you suck at it.  20 years of being away is showing up.   After finding the big booger in the oil pan yesterday, I chalked it up to issues that would blame it on other people. The reality is that it took a neighbor who has been practicing his common sense to ask "is it water?".  For the last 24 hours I have been mentally kicking myself in the a$$ for not spending the effort to realize what I was looking at.  Lots of work and sweat went in to the project after the point of which I should have said "Stop".  

So now here we are with a engine that could potentially turn to crap a week after I get it going.  As in the move the "Incredibles", not happy Bob, NOT HAPPY.  So what to do now?  

The reason for the water was found and can be read about here:  351 Windsor Intake Lesson


Frost King comes through again!

New flexplate.


The source of much grief.  Limited space.


Block and inspection plate scored from junk yard

Attemped dent repair.  Not so fixed


Saturday, August 24, 2013

Bolt Debacle


During my 30 minute run today I realized that this had boiled down to the bolts.  I had a water pump bolt snapped off in the block, all of my transmission bolts wouldn't fit, the water pump bolts that weren't broken needed to be replaced, the timing cover bolts had to be sorted out and cleaned, and lets not forget the "better Idea from Ford" to use metric head bolts with standard treads for all the brackets I raped of the 1990 F150.  Damn bolts.

Not to slander the previous owner, but the "fresh" 351w is about as "fresh" as the bottom of a 500 barrel oil field tank in West Texas.  To quote David Freiburger on his Roadkill series, "this thing is clapped".  Maybe not so much.  It runs and I pretty much expected a larger amount of wear and tear than was stated.  It runs too, right though your fingers like bad gojo.  The booger in the bottom of the oil pan was sure signs of some one pouring after market engine crap in it.  It was always my intention to set it up get it running for a while and then after the kinks were gone put a real 351w in it.

So after booger removal and a good de-greasing and clean up, we (Alaina and I) got the timing cover and oil pan installed.  Then the new balancer from Summit Racing showed up JIT.  The old one looked like an 8th grade potter had sculpted the yoke.  The likely hood of it sealing was slim to none and age old silicon smeared on the outside of the timing cover was a indication of an amateur stop leak prevention method.  I detest leakage.

Per the instructions the balancer was boiled for 15 minutes and presto!  The thing slid right on!  The install kit I got from O'Reily's only took a half of a turn the stopped dead.  I torqued the bolt to 90#'s and done.  Since I am upgrading to a serp belt system, I found this water pump and it made all the measurement requirement and will probably work with a stock timing cover due it's configuration.  It can be purchased at American Muscle for $44.99 no shipping!  


The paint degreaser did a number on the the clean up!

This was covered in grease and gravel

The dent you see here almost shuts off a cylinder

Most pose with a muffin pan

Jegs timing cover

Full rubber gasket installed well

The booger

The water pump configuration

Backer plate with round holes.

Bolts prevented  me doing any more than this